👨💻 WordPress Development Installing Roots Trellis, Bedrock & Sage in Windows 10
Roots Trellis, Bedrock & Sage are a set of tools for WordPress development that will make your life 100x easier and help you produce a better end product!
📅 March 30, 2019
Installing Virtual Box
First things first we need to install VirtualBox on our machine. The version I am using is just the latest stable release from the VirtualBox website. If you want to follow along exactly with me then the exact VirtualBox version you should install is 6.0.4
Download the latest version of VirtualBox from this link. Virtual Box Download Page. Make sure to also grab the VirtualBox Extension Pack extension as well as that is required.
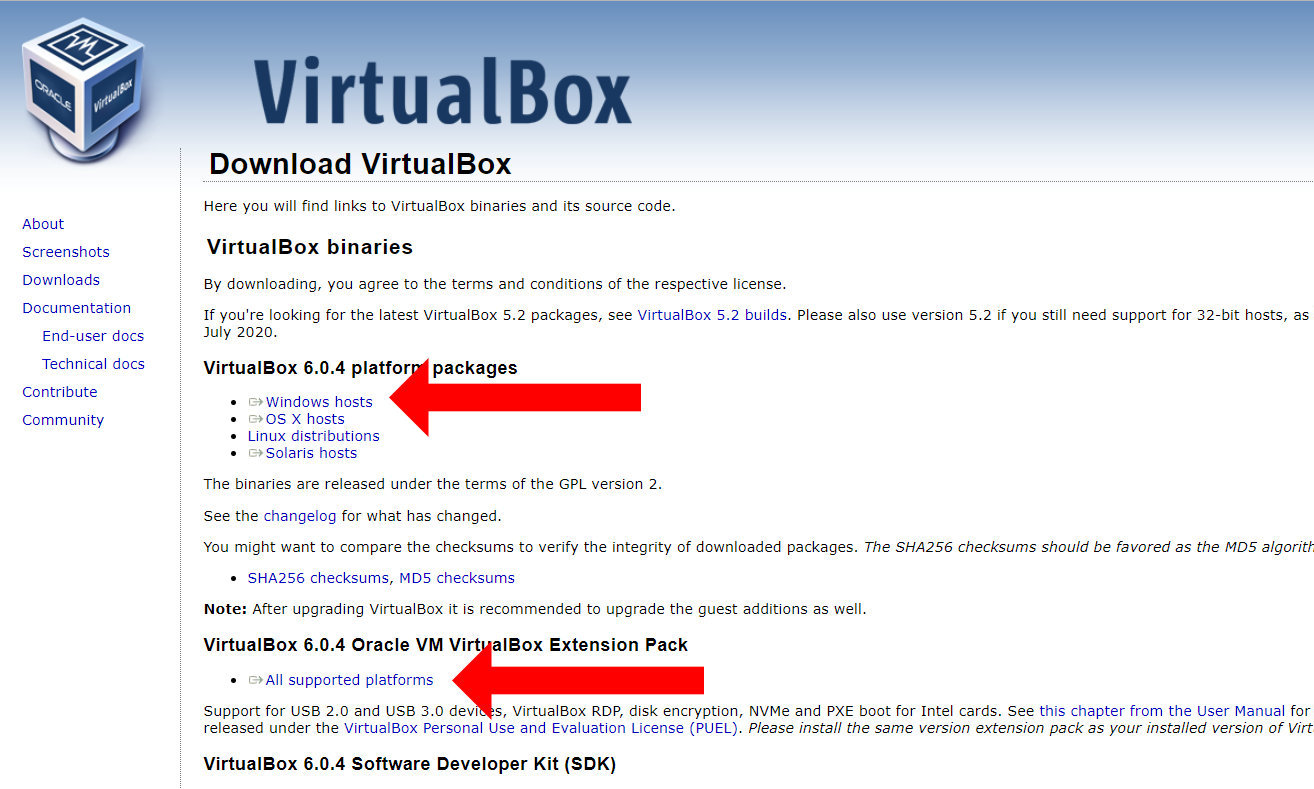
Download links to my exact version of VirtualBox and VirtualBox extension pack
Windows - VirtualBox 6.0.4 Download
VirtualBox 6.0.4 Extension Pack
After VirtualBox finishes downloading you will have to run the installer to install it to your machine. You can just keep pressing next until the installer is finished. There are no special instructions in this step.
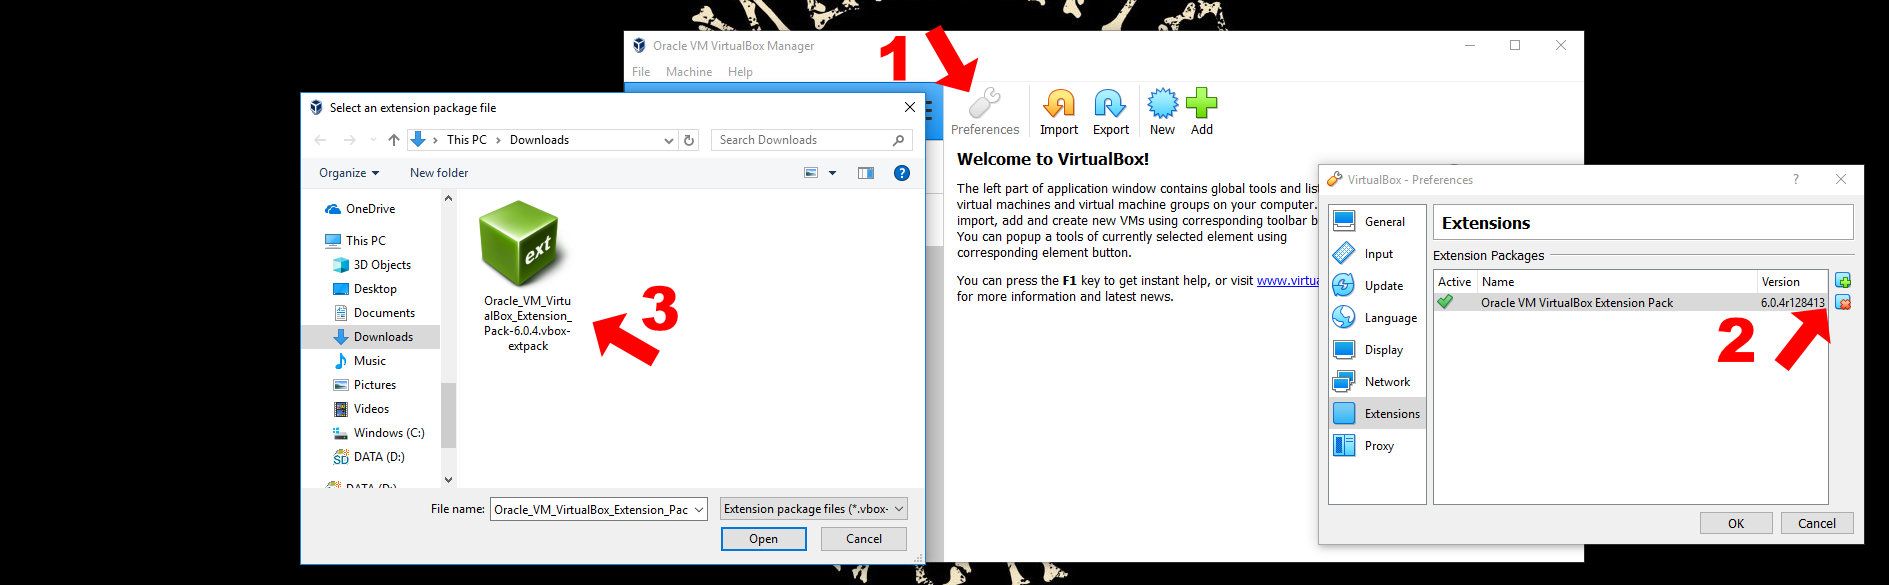
When VirtualBox is finished installing you will need to install the VirtualBox Extension Pack. To do this you will first need to run VirtualBox. After VirtualBox starts go to preferences, which is the icon that looks like a wrench, -> extensions. Then you will have to click the little blue square with the green plus sign. The square is located on the middle right side of the window. Then navigate to where you downloaded the VirtualBox extensions pack file and select it. Confirm that you want to install, agree to the Terms of service by scrolling all the way to the bottom and clicking agree.
Alright, now that we have VirtualBox correctly installed it is time to move on to installing vagrant!
Installing Vagrant
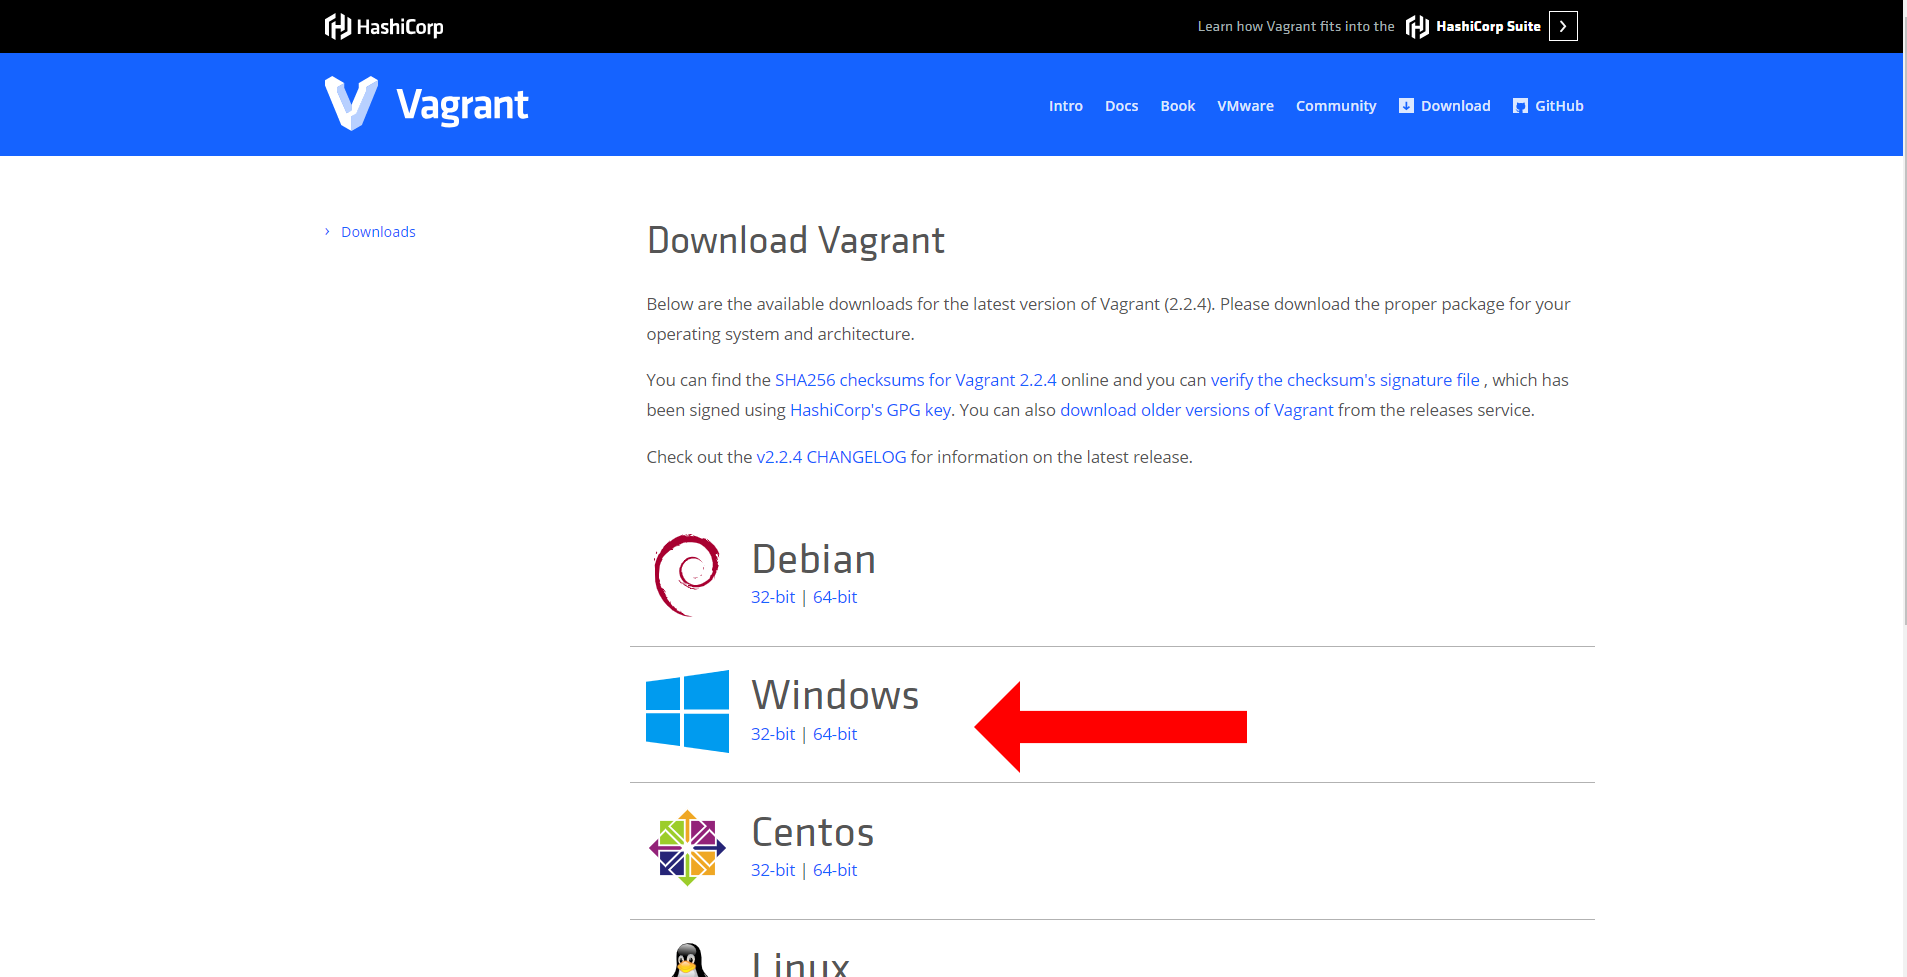
Navigate to the Vagrant Download Page and download the latest version of vagrant. I would suggest using the 64 bit version. I am personally using version 2.2.4.
Here is a download link to the exact version of Vagrant that I am using.
Windows - Vagrant 64-bit 2.2.4
The download took a while to complete for me. Don't be surprised if your download takes a decent amount of time to complete as well.
After the installer finishes downloading navigate to where you downloaded it and run the installer. Again just like installing VirtualBox you don't have to do anything special when installing vagrant. Just agree to the terms of service and keep pressing next.
After the installer is finished it will ask you to restart your computer. Make sure to save and close everything important then press yes to restart your computer.
Great now we are one step closer to getting the Roots Trellis, Bedrock, and Sage setup on Windows 10. We will now enable and install Windows Subsystem for Linux.
Installing WSL (Windows Subsystem for Linux)
Now lets move on to the fun part... installing and setting up windows subsystem for linux.
The Microsoft Docs have a really nice guide on installing WSL. Here is the guide.
First open up a PowerShell window as administrator. Then enter this line of code to enable the windows subsystem for Linux.
Enable-WindowsOptionalFeature -Online -FeatureName Microsoft-Windows-Subsystem-Linux
After the command finishes make sure to restart your computer before continuing.
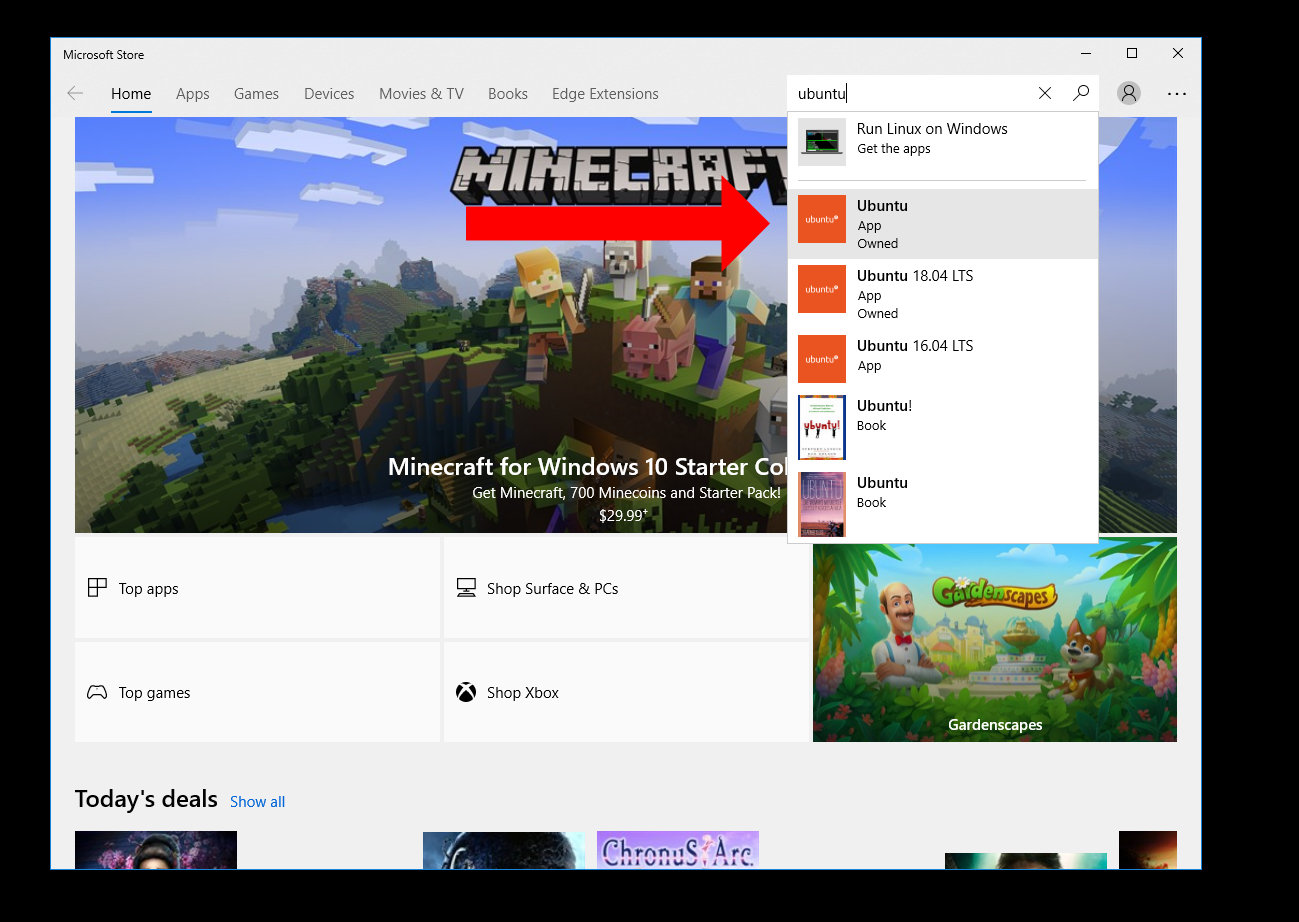
Now its time to install a version of Linux on your windows machine. I personally prefer Ubuntu so that's what I will be installing.
Open the Microsoft Store and search for Ubuntu. Select the Option that simply says "Ubuntu". This is the latest version of Ubuntu and also the version that I am using. You will be taken to the Ubuntu store page, next click on the blue install button on the toppish right of the store page. Wait for it to install and then press launch.
You should see a terminal window popup with the text "Installing..." do not close this window. After Ubuntu is finished installing it will ask you to pick a username and password. Make sure to use a good password that you can remember.
Before we continue I would like to take a couple of steps to greatly improve your experience with WSL.
- We will add the WSL exclusion to the windows firewall. This will greatly improve the responsiveness and I/O of WSL. (optional)
- Install WSLtty as an alternative terminal to the one that comes with WSL. (optional)
If you want to skip these steps then just continue to the next section.
Adding WSL Exclusions to Windows Defender
Open up Windows Explorer and navigate to this path "%USERPROFILE%\AppData\Local\Packages"
Look for the folder that starts with "CanonicalGroupLimited.UbuntuonWindows"... Enter that folder and then copy the entire path.
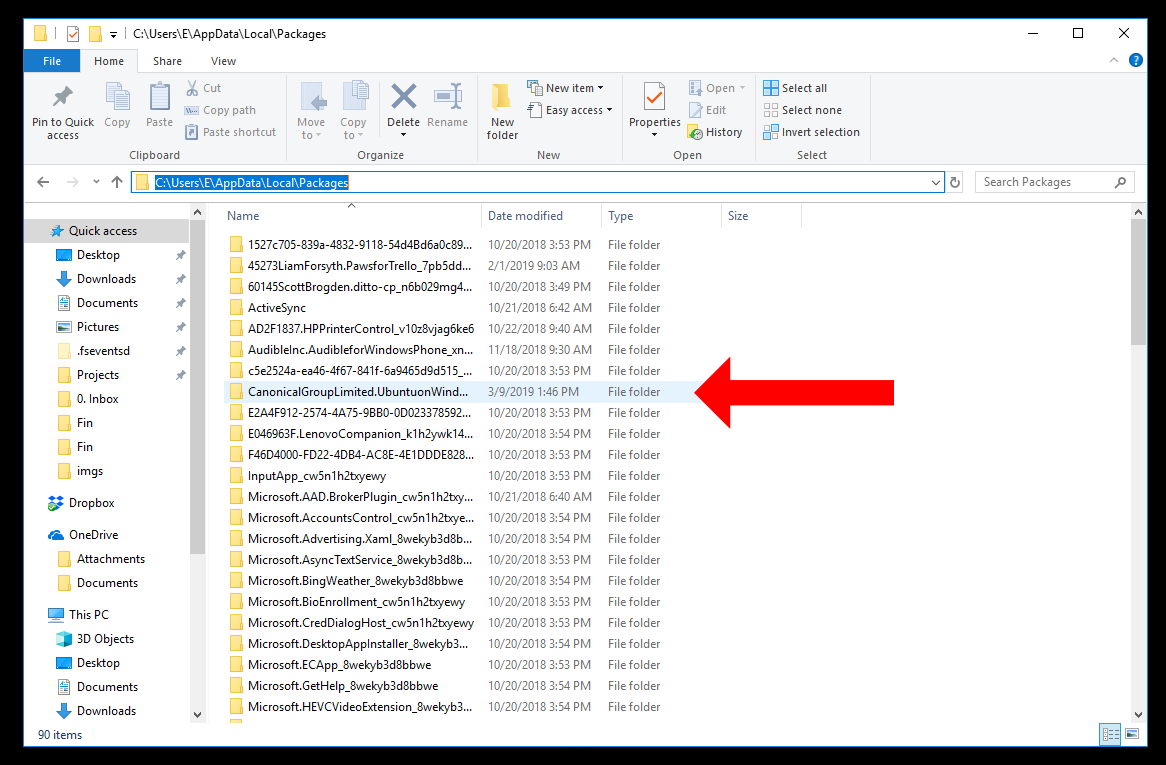
Next we will open up the Windows Defender Security Center and click on the section that says "Virus & threat protection". Then click on the "Virus & threat protection settings" section. Scroll to the bottom of the page till you see the Exclusions section. Click on "Add or remove exclusions". Next click on "Add an exclusion" then click on folder. Paste the path to the ubuntu install that we copied earlier into the path field in windows explorer and press enter. Then press select folder.
(Optional), All out disabling real time protection.
In order to fully disable real time protection follow the guide in the link below.
Disable Real Time Protection to Improve performance in WSL
I disabled Real Time Protection by opening Windows Defender Security Center -> Virus & threat protection -> Virus & threat protection settings -> Real-time protection -> Off
I would only keep real time protection off on a secured network and when you are working on a certain project. If you are surfing the web and downloading random torrents you should probably enable Real time protection again. 👍
Install WSltty as an alternative terminal (optional)
Okay now on to installing WSLtty. This terminal was recommended in this post. I tried it out and grew to like it.
To install WSLtty first visit the releases page on their github. Download the latest versions exe file and run the installer. You will most likely get a warning when running the installer allow the installer to proceed and then WSLtty will begin installing.
After the install is finished open your start menu (press the windows key) and type in "Ubuntu Terminal" you should see an option pop up that has a penguin icon. Select that option. Now you should see WSLtty open on your desktop.
By default WSLtty looks pretty bad IMO 🤮. Let's quickly change that. Right click on the title bar of the window and select options.
You should see an options window appear. In the Looks section you should see something that says Theme with a dropdown next to it. Click and dropdown and select a theme you like. I am personally using dracula. Afterwards Click on the Text section on the left side of the options window. Under the fonts section click "Select..." and then change the font size to a comfortable reading size. Mine is set to 14pt.
That's it now you can move on to the next section.
Setting up WSL for Trellis
Okay now that we have WSL let's move on to preparing it for trellis.
First run a apt update and upgrade
sudo apt update
sudo apt upgrade -y
After your update is finished we need to tell WSL to use the windows version of vagrant so we will create an alias in the bashrc file. The following commands will accomplish this.
echo 'alias vagrant=vagrant.exe' >> ~/.bashrc
source ~/.bashrc
Now we need to install ansible
Installing Ansible
We will want to install Ansible through pip instead of apt. So first we must install pip.
sudo apt-get install python-pip
Now install Ansible with pip. Note that the version I am installing is version 2.5.1. I recommend you use the same version as well.
pip install ansible==2.5.1
Bam! Ansible is now installed. Let's move on to installing Composer and NodeJS.
Installing Composer in WSL
Use this article as reference for installing composer in WSL. Here
First make sure php dependencies are installed
sudo add-apt-repository ppa:ondrej/php

sudo apt-get update

sudo apt install php7.3 php7.3-curl php7.3-xml php7.3-mbstring php7.3-gd php7.3-sqlite3 php7.3-mysql php7.3-zip

sudo apt install unzip
# This is for later when we are installing bedrock with composer
Now verify that php is working
php -v
Now time to download and install composer. I have included the steps I used below for reference but please make sure to follow the instructions on the composer download page since instructions may change with new version releases.
php -r "copy('https://getcomposer.org/installer', 'composer-setup.php');"

php -r "if (hash_file('sha384', 'composer-setup.php') === '48e3236262b34d30969dca3c37281b3b4bbe3221bda826ac6a9a62d6444cdb0dcd0615698a5cbe587c3f0fe57a54d8f5') { echo 'Installer verified'; } else { echo 'Installer corrupt'; unlink('composer-setup.php'); } echo PHP_EOL;"

php composer-setup.php

php -r "unlink('composer-setup.php');"
Now if you ls you should have a file called "composer.phar" what we will do next is move this file into our /usr/local/bin folder to add it to the global path. This will allow us to run composer from the command line anywhere.
sudo mv composer.phar /usr/local/bin/composer
Now verify that composer is working
composer
Alright time to install nodejs in WSL!
Install WP-CLI
Run the following commands to install WP-CLI
cd ~ && curl -O https://raw.githubusercontent.com/wp-cli/builds/gh-pages/phar/wp-cli.phar

chmod +x wp-cli.phar

sudo mv wp-cli.phar /usr/local/bin/wp
Install Nodejs in WSL
I referenced this guide on installing nodejs in WSL .
Lets install build-essentials because we will need it to compile and install nvm
sudo apt-get install build-essential
Now run the following command to download and run the nvm installer
curl -o- https://raw.githubusercontent.com/creationix/nvm/v0.33.5/install.sh | bash
Exit your terminal and then open it back up before continuing to the next step.
exit
Now let's install the latest stable version of nodejs and then tell nvm that we want to use that version
nvm install stable
nvm use stable
Verify that nodejs is installed properly.
node -v
npm -v
Alright now we have Nodejs installed on our system. Let's move on to installing the plugins for vagrant in WSL and then finally install trellis.
NFS support for Windows 10
Running the command below will 10x the performance of Vagrant boxes on Windows! Apparently it can cause issues with some machines so if you are running into errors try removing this plugin first.
vagrant plugin install vagrant-winnfsd
Apparently it can cause issues with some machines so if you are running into errors try removing this plugin first.
Helpful Extras (optional)
Install tmux, dos2unix, htop, neofetch
sudo apt install tmux dos2unix htop neofetch
Tmux is a terminal multiplexer, whatever that means 😂. It's a powerful tool but all I use it for is to split my terminal into multiple panes/sections and to be able to detach from my tmux session and then reattach again letter. This allows you to be able to run commands on a server without having to keep a window open.
dos2unix converts the line endings of Windows & Mac files to Unix line endings and vice versa.
htop is a really useful program, think Task Manager for your terminal, it let's you view how much recourses are being used on your computer/server & lets you easily search and end processes. Pretty sweet 👍!
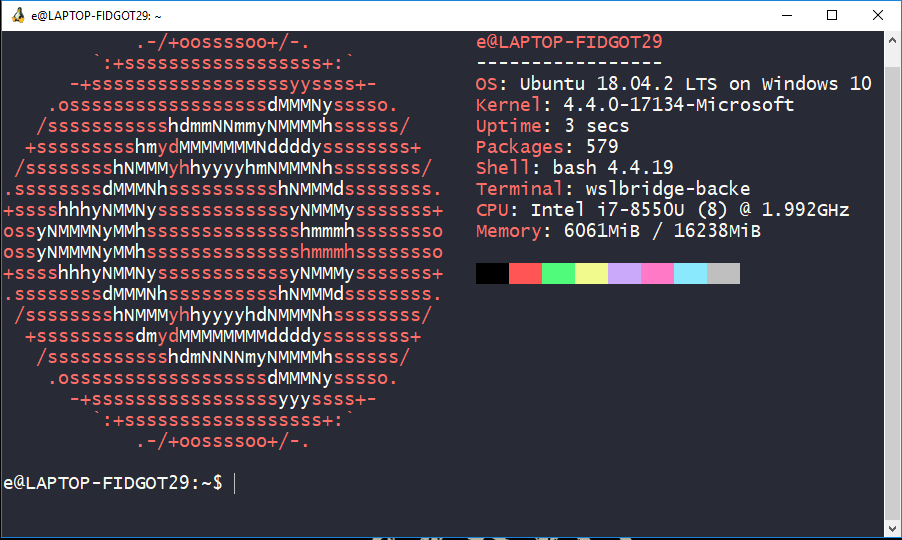
neofetch is just for eye pleasure. I have it set to open with bash/zsh so it prints my system specs and OS logo on the terminal window. Besides looks this program is pretty much useless. Buuuttttt.... look at how nice it looks!
Installing Roots Trellis & Bedrock on Windows 10
Now that all of the ground work has been laid it is finally time to setup Trellis.
We will be following a slightly modified version of the installation instructions located on the Trellis GitHub.
- Create a new project directory
mkdir example.com && cd example.com
- Install Trellis
git clone --depth=1 https://github.com/roots/trellis.git && rm -rf trellis/.git
- Install Bedrock into the site directory
composer create-project roots/bedrock site
Setting up Local Development Settings
Navigate into the newly cloned trellis/ directory then navigate into the folder group_vars/ and finally into development.
trellis/
     |___ group_vars/
          |___ development
               |___ wordpress_sites.yml # Configure url, redirects, admin email, etc
               |___ vault.yml # Sets passwords for admin, db
The wordpress_sites.yml file lets you set things like the url for the project (canonical in the file), redirects, ssl, admin email, local url path... You will always edit this file when working on projects so get familiar with it.
Another file that you will always edit is the vault.yml file in the same directory. This file lets you set the password for the WordPress admin & mysql database. You should change any default passwords to randomly generated secure passwords like the ones produced by LastPass.
Edit wordpress_sites.yml
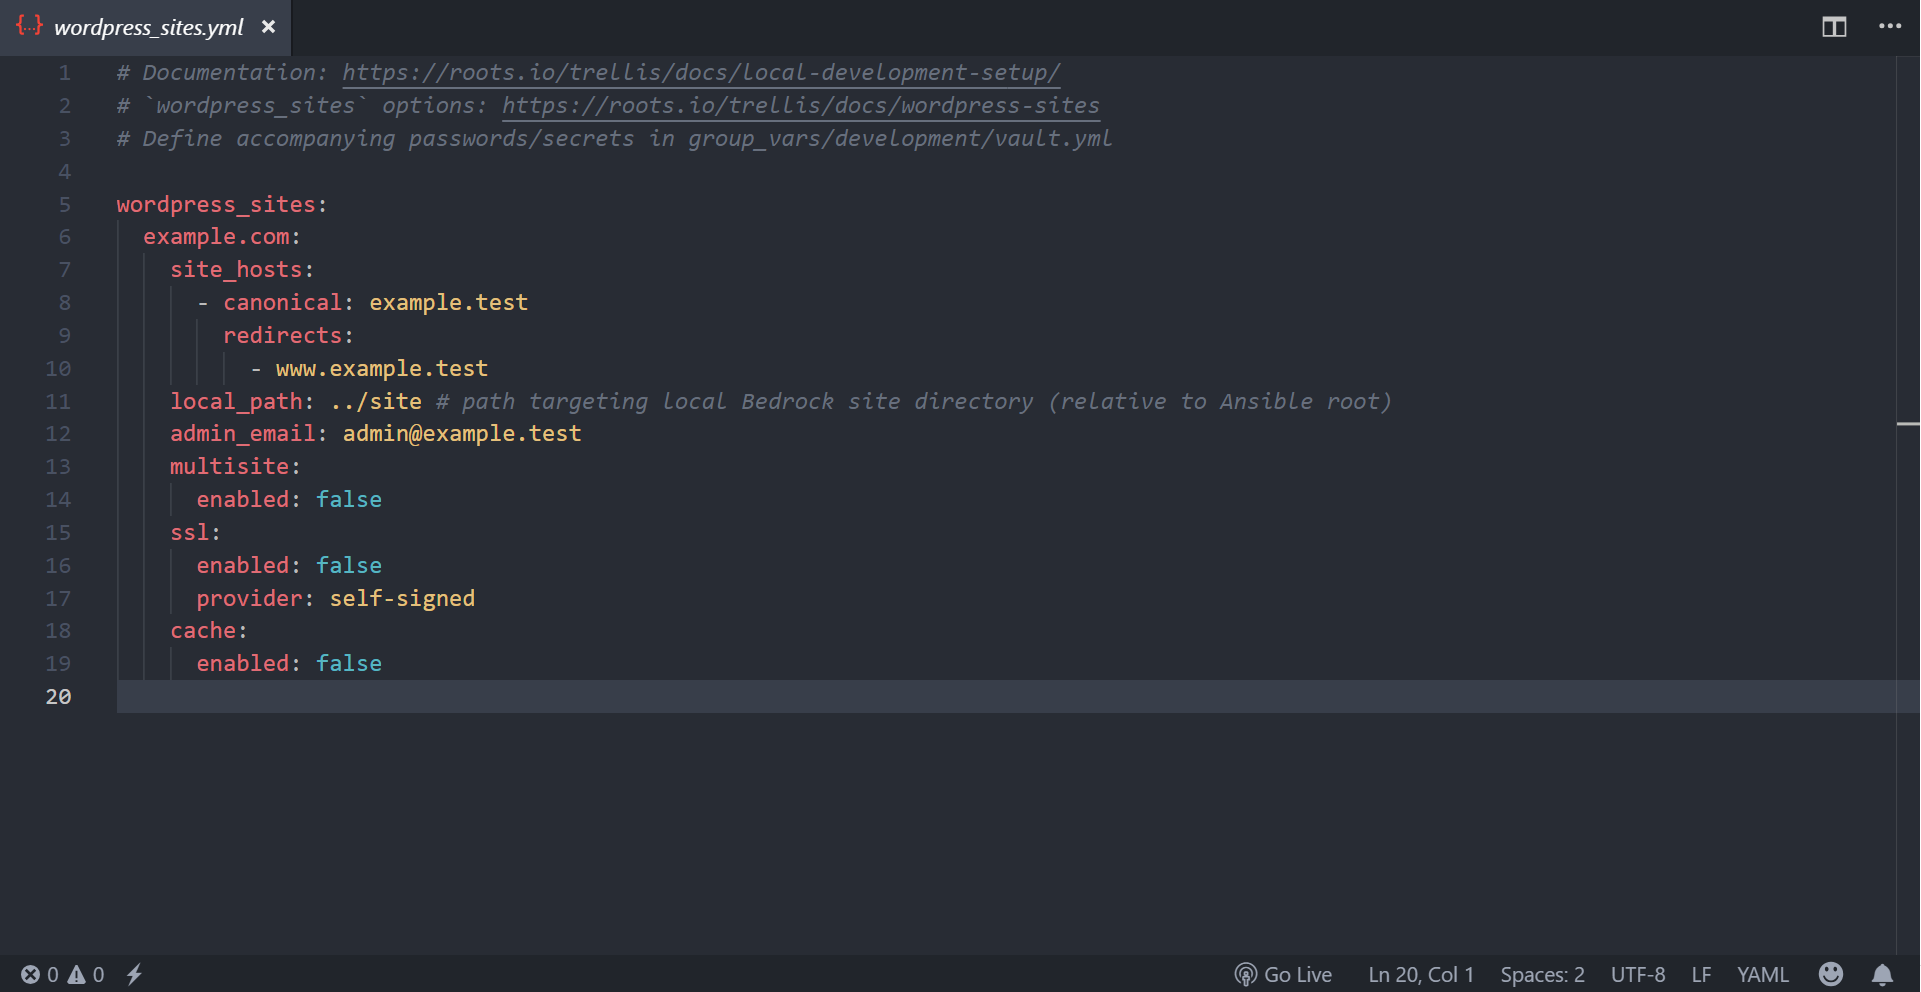
Open wordpresssites.yml with your favorite code editor. You should see something like this. _If you run into errors remove both redirect lines.
---
wordpress_sites:
  example.com: # 1 - Project name
    site_hosts:
      - canonical: example.test # 2 - Url you will enter into your browser
        redirects: # 3 - If you have errors try removing these two lines.
          - www.example.test
    local_path: ../site # path targeting local Bedrock site directory (relative to Ansible root)
    admin_email: admin@example.test # 4 - Make sure to set an appropriate admin url for WordPress
    multisite:
      enabled: false
    ssl:
      enabled: false
      provider: self-signed
    cache:
      enabled: false
- Think of this as a name for your project. If you are building website xyz.com then name this xyz.com
- Lets you set the url for your project. Think of xyz.local or xyz.test
- Lets you set redirects for xyz.local. If you run into errors just remove this whole redirects section.
- Sets the email address for the WordPress admin. Think or something along those lines webmaster@xyz.com
Now well move on to the vualt.yml file. Make sure to keep note of what you put down for # 1 (project name)
Editing vault.yml
When you open vault.yml you should see something that looks like this...
---
vault_mysql_root_password: devpw # CHANGE THIS IN PRODUCTION
---
vault_wordpress_sites:
  example.com:
    admin_password: admin # CHANGE THIS IN PRODUCTION
    env:
      db_password: example_dbpassword # CHANGE THIS IN PRODUCTION
Make sure to change the default passwords to secure randomly generated ones. I would recommend a length between 20 - 50 characters.
It should look something like this
2TawKXr9XKxVeRRm\$13BaSvZiyXrOv
Now that's a good password!
After you have set the new password and saves you are ready to continue to the next step.
Edit Vagrant file
Navigate into the root of your trellis folder (example.com/trellis/). Now open the Vagrantfile with your code editor. Search for "ansible.version" you will need to update this file so that it references Ansible version 2.5.1 instead of vconfig.fetch('vagrant_ansible_version')
# The line you're looking for
-ansible.version = vconfig.fetch('vagrant_ansible_version')

# Change it so it looks like this
+ansible.version = '2.5.1'
Vagrant up
It is finally time to start this puppy!
Inside the root of your trellis folder run the following command. This will create your virtual machine and provision.
# example.com/trellis
vagrant up
Installing Sage theme
Navigate to the site directory which is located at the root of your project (example.com/ ). From there navigate to web/->app/->theme/->
Now to install Sage theme just run the command below
# Command should be run in example.com/site/web/app/themes/
composer create-project roots/sage theme-name
After you run this command it will ask you a series of questions about your theme. Enter the fields based on your needs. Near the end you get to chose the framework you would like to use. Personally I use either Bootstrap or none.
When the command is finished enter your new theme folder
cd theme-name
Now run yarn to initialize your project and then build a baseline
yarn
yarn build
When everything is finished just run yarn start to have webpack watch your files and automatically reload your page when files update.
yarn start
Fin
Phew! That took a while but in the end it was well worth all the work. Using the Roots Stack has has, and is, helping me become a better developer and provide a better quality product for my clients. I really love using it and I'm sure you will too!
References
https://roots.io/getting-started/docs/windows-development-environment-trellis/
https://discourse.roots.io/t/guide-developing-on-windows-10-using-wsl/9380?source_topic_id=12076
https://github.com/mintty/wsltty
https://www.virtualbox.org/wiki/Downloads
https://www.vagrantup.com/downloads.html
https://www.jeffgeerling.com/blog/2018/installing-php-7-and-composer-on-windows-10-using-ubuntu-wsl